Yes, with basic tools, a multimeter, and safety precautions, you can diagnose and fix common electric scooter motor issues yourself.
Diagnosing the Problem
Common Symptoms of Motor Failure
Identifying the signs of motor failure in an electric scooter is crucial for timely and effective repair. Lack of acceleration, unusual noises, and complete failure to start are the primary indicators. When an electric scooter’s motor starts failing, users may notice a significant drop in acceleration, with the scooter struggling to reach previously achievable speeds. For example, if a scooter that used to accelerate to 20 miles per hour now barely reaches 10 miles per hour, this is a clear symptom of motor degradation.
Another common symptom is the presence of grinding, whirring, or clicking noises during operation. These sounds suggest internal components are wearing out or have become misaligned. Compare this to a healthy motor that operates with a smooth, consistent hum.
Lastly, the most obvious sign is when the scooter fails to start altogether. Despite a fully charged battery, the motor does not respond when the throttle is engaged, indicating a severe failure that requires immediate attention.
Initial Diagnostic Steps
To diagnose the problem with an electric scooter motor, start with visual inspection and battery check.
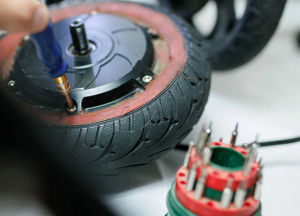
Visual Inspection: Look for visible signs of damage or wear. Check the motor and its connections for any loose wires or signs of corrosion. Damage to the motor casing or any visible disconnections can often be the culprit behind performance issues.
Battery Check: Verify the battery’s voltage and health because a failing battery can mimic symptoms of motor failure. A healthy electric scooter battery should typically hold a charge close to its rated capacity.If a scooter’s battery is rated at 24 volts, readings significantly lower than this, such as 20 volts or less, indicate a battery issue, not necessarily a motor problem.
By thoroughly inspecting these elements, one can determine whether the issue lies with the motor itself or with other components of the scooter. These steps are essential in pinpointing the cause of the failure and formulating an effective repair strategy. Remember, addressing motor failure early can save on repair costs and extend the scooter’s lifespan, ensuring it remains a reliable mode of transportation for years to come.

Preparation for Repair
Before attempting any repair on an electric scooter motor, preparing adequately ensures safety and increases the chance of a successful repair. This preparation involves gathering the right tools and adhering to safety precautions.
Gathering the Right Tools
A well-prepared toolkit is crucial for effectively diagnosing and fixing motor issues. Essential tools include:
- Screwdrivers: A set of flathead and Phillips screwdrivers for opening the scooter’s panels and handling small screws.
- Wrenches: Adjustable wrenches are necessary for loosening and tightening bolts that secure the motor and other components.
- Multimeter: This is vital for testing the electric scooter’s electrical components, such as the motor’s power output, which typically ranges from 250 watts to 2000 watts, and checking for electrical continuity.
- Soldering Iron: Needed for repairing or replacing electrical wiring. Ensure it has adjustable temperature settings to accommodate different soldering needs.
- Replacement Parts: Keep on hand any specific parts known to wear out or commonly cause issues, such as brushes for brushed motors, bearings, or even a replacement motor if needed.
Important: Always verify the specifications and sizes of the tools and replacement parts to match your scooter’s requirements. Using incorrect sizes can cause damage to the scooter and the components you are trying to repair.
Safety Precautions
Working on electric scooters, especially the motor and its electrical components, requires strict safety measures to prevent accidents.
- Wear Protective Gear: Safety glasses protect your eyes from sparks or debris. Gloves reduce the risk of cuts and insulate against electric shock.
- Disconnect Power Sources: Before beginning any repair, ensure the scooter is off and disconnect the battery. This prevents accidental activation of the motor and electrical shocks.
- Work in a Ventilated Area: If using chemicals or soldering, proper ventilation is crucial to avoid inhaling fumes.
- Fire Safety: Keep a fire extinguisher nearby when working on electrical components. Lithium-ion batteries, commonly used in electric scooters, pose a fire risk if punctured or improperly handled.
Bold Reminder: Safety cannot be overstated. Taking precautions protects not only the individual performing the repairs but also the integrity of the scooter.
By adhering to these guidelines, you’ll create a safe and efficient environment for repairing your electric scooter’s motor, ensuring that the process goes as smoothly as possible.
Step-by-Step Repair Guide
Repairing an electric scooter’s motor involves a series of steps that require careful attention to detail and adherence to safety measures. This guide will take you through disassembling the motor, diagnosing issues, fixing common problems, and reassembling the motor.
Disassembling the Motor
Start by removing the scooter’s deck to access the motor. Most scooters use Phillips or Allen screws for securing the deck. Keep all screws and parts organized to ensure easy reassembly.
Disconnect the motor from its power source by carefully unplugging the connectors. Some scooters might have a locking mechanism on the connectors, requiring a gentle press to release.
Remove the motor from its mount by loosening the bolts or screws that hold it in place. The weight of motors can vary, with some models featuring motors up to 2000 watts, so handle with care to avoid injury or damage to the scooter.
Identifying the Issue
Use a multimeter to check for electrical continuity and proper voltage output. A functioning motor should display a consistent voltage that matches the scooter’s specifications. A significant drop in voltage could indicate a problem.
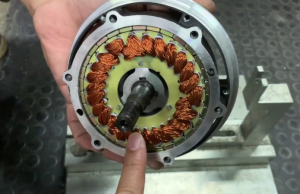
Inspect the motor for visible signs of wear or damage, such as burnt wires, damaged rotor, or worn-out bearings. Overheating can cause visible damage to the wiring insulation and components.
Fixing Common Problems
For electrical issues, check the wiring and connectors for signs of fraying or disconnection. Solder any broken connections and replace wires that show signs of damage.
If the motor is not running smoothly, lubricate the bearings and replace them if they show excessive wear. Bearings have a critical role in the motor’s efficiency and performance.
Replacing Worn-Out Components
Identify components that require replacement, such as the brushes in a brushed motor, which wear down over time. A new set of brushes can restore motor function to its optimal level.
For brushless motors, replace the electronic speed controller (ESC) if diagnostics indicate it is not functioning correctly. The ESC regulates power to the motor, and its failure can result in loss of speed control or motor function.
Rewiring and Connections
Ensure all connections are secure and properly insulated to prevent short circuits. Use heat-shrink tubing or electrical tape to insulate exposed wires.
Double-check the wiring diagram of your scooter to ensure all components are correctly connected. Incorrect wiring can lead to motor failure and potentially damage the scooter’s electrical system.
Reassembling the Motor
Carefully place the motor back into its mount, securing it with the original bolts or screws. Ensure it is tightly secured to prevent movement that could lead to damage.
Reconnect the motor to the power source, ensuring that all connections are secure and correctly aligned. Test the connections with a multimeter to ensure proper electrical flow.
Replace the deck and secure it with the previously removed screws or bolts. Make sure the deck is firmly attached to avoid any rattling or instability during operation.
Bold Conclusion: Following these steps diligently can lead to a successful repair of your electric scooter’s motor, enhancing its performance and extending its lifespan. Always prioritize safety and consult the scooter’s manual or a professional if unsure about any step in the process.
Testing and Troubleshooting
After completing the repair of an electric scooter’s motor, it’s essential to test and troubleshoot to ensure the motor operates correctly. Proper testing can confirm the success of the repair, while effective troubleshooting can identify any remaining issues.
Testing the Motor After Repair
Conduct a static test by turning on the scooter’s power and checking for any unusual noises from the motor. Noises such as grinding or clicking may indicate that some parts are not correctly installed or that there is further damage inside the motor.
Check the motor’s response to throttle inputs. The motor should respond smoothly and promptly. Any delay or jerkiness in response suggests possible issues with the wiring or electronic components.
Perform a dynamic test by taking the scooter for a short ride on a safe, flat surface. Monitor the scooter’s acceleration, top speed, and braking efficiency. A well-repaired motor should restore the scooter’s performance close to its original specifications, such as reaching a top speed within the manufacturer’s stated range.
Measure the motor’s power output using a wattmeter, if available. Compare the readings to the scooter’s specifications. A significant deviation from the expected power output indicates an issue that may need further investigation.
Troubleshooting Post-Repair Issues
If the motor does not start, double-check all electrical connections, including the battery, motor connectors, and any inline fuses. Ensure that the connections are secure and free from corrosion.
For reduced power or efficiency, inspect the battery charge level and health. Batteries degrade over time, reducing their capacity to hold a charge. Use a battery tester to check its health. If the battery is in good condition, recalibrate the scooter’s settings according to the manufacturer’s instructions, as incorrect settings can impact performance.
Address overheating issues by ensuring that the motor’s ventilation system is clear of obstructions. Overheating can also be caused by overloading the scooter beyond its weight capacity or riding in conditions that strain the motor excessively, such as steep inclines.
If unusual noises persist, dismantle the motor again to inspect for any misaligned parts or foreign objects that may have been missed during the initial repair. Check the bearings and gears for proper lubrication and wear.
Bold Statement: Successfully testing and troubleshooting your electric scooter’s motor after repair ensures that the scooter is safe to use and operates at its best. Always refer to the scooter’s manual for specific testing procedures and troubleshoot according to the manufacturer’s recommendations. If issues persist, consider seeking help from a professional technician to avoid further damage to the scooter.